This article will walk you through connecting a wallet to the WAX blockchain, integrating it into a ReactJS interface, and reading data from a WAX smart contract table. We’ll also cover the NFT staking process and how to claim rewards.
Let’s start with the procedure on how to connect your web application to WAX blockchain.
Starting with WAX wallet connection, we utilize the Universal Authenticator Library (UAL) in our ReactJS app for easy wallet integration and authentication. The `<UALProvider>` component serves as the authentication context provider, facilitating smooth interactions between the app and various blockchain wallets, simplifying the integration process for developers.
Incorporate the `<UALProvider>` into your React app to streamline the authentication process, offering a unified interface for various wallet providers. This setup is pivotal for connecting to wallets efficiently. For step-by-step guidance and configurations, the UAL GitHub repository is an invaluable resource, providing detailed documentation and examples for React integration.
<UALProvider> component:
- chains={[waxChain]}: Specifies the blockchain configuration.
- authenticators={waxAuthenticators}: Indicates an array of authenticators available for user selection (e.g., Anchor and Wax).
- appName={‘AppName’}: Sets the application name used for identification during authentication.
 <UALProvider
      chains={[waxChain]}
      authenticators={waxAuthenticators}
      appName={'AlchemySwap'}
    >
      <App />
    </UALProvider>
Next, we need to configure the actual config file to connect our wallets to WAX.
- The waxChain object:
Contains configuration for connecting to the WAX network, such as the chain ID and RPC server addresses.
- Creating instances of Anchor and WAX cloud wallet:
const anchor = new Anchor([waxChain], { appName: name })
An Anchor instance is created with the WAX network configuration and the name of the application.
const waxCloudWallet = new Wax([waxChain], { appName: name })
Creates a Wax instance with the same configuration.
- Array waxAuthenticators:
Defines an array of authenticators to be used based on a condition. Here, we can edit the state of the mainnet or testnet network.
Below is a code example of wax.config.js file
import { Anchor } from 'ual-anchor';
import { Wax } from '@eosdacio/ual-wax';


import {
  WAX_CHAIN_ID,
  WAX_RPC_ENDPOINTS_HOST,
  WAX_RPC_ENDPOINTS_PROTOCOL,
} from '../constants/wax.constants';


export const waxChain = {
  chainId: WAX_CHAIN_ID,
  rpcEndpoints: [
    {
      protocol: WAX_RPC_ENDPOINTS_PROTOCOL,
      host: WAX_RPC_ENDPOINTS_HOST,
      port: '',
    },
  ],
};


const anchor = new Anchor([waxChain], { appName: 'TestGame' });
const waxCloudWallet = new Wax([waxChain], { appName: 'TestGame' });


export const waxAuthenticators =
  process.env.REACT_APP_MAINNET === 'mainnet'
    ? [anchor, waxCloudWallet]
    : [anchor];
After triggering the `showModal()` method in your user interface, a modal window will appear, displaying the wallets available for connection. This step is crucial for users to choose their preferred wallet for interacting with the WAX blockchain within your application.
import { UALContext } from 'ual-reactjs-renderer';
const { activeUser, showModal } = useContext(UALContext);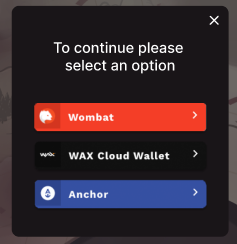
After connecting to the WAX blockchain, the next step is to read data from a WAX smart contract table.
This involves using a function to fetch rows of data from the table. The function `FetchRows` is specifically designed for this purpose, enabling the application to access and display the required data from the blockchain. This process is essential for integrating blockchain data into your application’s user interface, providing users with real-time information directly from the WAX blockchain.
export const getTableData = async ({ contract, scope, table }) => {
  const pageSize = 1000;
  let lowerBound = 0;
  let fetchMore = true;


  const assets = [];


  while (fetchMore) {
    // eslint-disable-next-line no-await-in-loop
    const { rows, more, next_key } = await fetchRows({
      contract,
      scope,
      table,
      limit: pageSize,
      lowerBound,
    });


    assets.push(...rows);


    if (more) lowerBound = next_key;
    else fetchMore = false;
  }


  return assets;
};
The `FetchRows` function, integral for reading data from the WAX blockchain, utilizes a configuration that employs the `rpc` and `get_table_rows` method. This setup facilitates the retrieval of data directly from the specified table, allowing your interface to display the blockchain data dynamically.
export const fetchRows = async ({
  contract,
  scope,
  table,
  limit,
  lowerBound = null,
  upperBound = null,
}) => {
  try {
    const config = {
      json: true,
      code: contract,
      scope,
      table,
      limit,
      lower_bound: lowerBound,
      upper_bound: upperBound,
    };


    if (!lowerBound) delete config['lower_bound'];


    if (!upperBound) delete config['upper_bound'];


    return await rpc.get_table_rows(config);
  } catch (e) {
    if (!e.message.includes('assertion failure')) {
      const isNewNetworkExist = reinitializeRcp();


      if (!isNewNetworkExist) throw new Error('NetworkError!');


      return await fetchRows({
        contract,
        scope,
        table,
        limit,
        lowerBound,
        upperBound,
      });
    } else {
      throw new Error(e.message);
    }
  }
};
Here is an example:
Task: Retrieve all user resources.
To do this, use the getResources function
activeUser – user
table – the contract table from which you want to extract data about resources.
export const getResouces = async ({ activeUser }) => {
    const { rows } = await fetchRows({
      contract: GAME_CONTRACT,
      scope: activeUser.accountName,
      table: 'resources',
      limit: 100,
    });

   return rows;
};
NFT Staking
Analyzing the staking process involves understanding the specific tools and mechanisms used in the farming item.
This process is crucial for optimizing the use of NFTs within the game, ensuring players can stake their assets efficiently and effectively for resource farming or other benefits.
To stake a farmingItem with your contract, begin by invoking the specific action designed for staking, accompanied by the `signTransaction()` auxiliary function for executing the transaction. This method secures the transaction and ensures that the farmingItem is staked as intended within your smart contract’s operational framework.
export const stakeFarmingTool = async ({ activeUser, selectItem }) => {
    return await signTransaction({
        activeUser,
        account: ’atomicassets’,
        action: 'transfer',
        data: {
            from: activeUser.accountName,
            to: GAME_CONTRACT,
            asset_ids: [selectItem],
            memo: `stake farming item`
        }
    });
};
export const signTransaction = async ({
activeUser,
account,
action,
data,
}) => {
await activeUser.signTransaction(
{
actions: [
{
account,
name: action,
authorization: [
{
actor: activeUser.accountName,
permission: 'active',
},
],
data,
},
],
},
{
blocksBehind: 3,
expireSeconds: 30,
}
);
};
Once your farmingItem is successfully staked, the next step is to stake your items (tools). For this action, you’ll refer to the specific function provided in the smart contract. This action allows for the staking of tools, further engaging with the game’s mechanics and enhancing your in-game assets’ utility.
For detailed instructions or to execute this action, you would typically refer to the provided link to the smart contract.
https://testnet.waxblock.io/account/atomicassets?action=transfer#contract-actions
The action for staking tools involves specifying the `wpId`, which identifies the farmingItem into which the tool is being staked. This parameter is crucial for directing the staking process to the correct item, ensuring that the tool enhances the intended farmingItem’s capabilities or benefits within the game.
export const stakeTool = async ({ activeUser, selectItem, wpId }) => {
return await signTransaction({
activeUser,
account: ‘atomicassets’,
action: 'transfer',
data: {
from: activeUser.accountName,
to: GAME_CONTRACT,
asset_ids: [selectItem],
memo: `stake items:${wpId}`
}
});
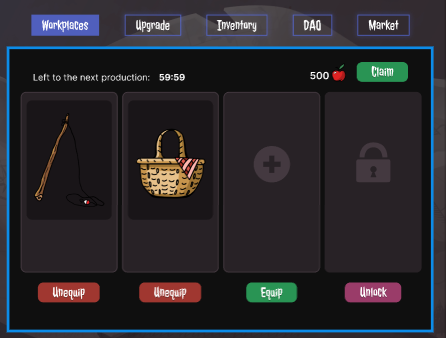
};The final step involves claiming resources earned through your staked farm item and tools.
After staking your farming item and utilizing tools from your inventory, resources accumulate over time, available for claim every hour from any tool-equipped farm. The user interface displays the accumulated resources, indicating the amount you can claim, making it easy to track your progress and rewards within the game.

The claim action itself has the following fields:
action – the name of the action in the contract
owner, farmingitem – fields that are sent to the contract
export const claimRes = async ({ activeUser }) => {
    return await signTransaction({
      activeUser,
      account: GAME_CONTRACT,
      action: 'claim',
      data: {
        owner: activeUser.accountName,
        farmingitem: 1,
      },
    });
  };
Here is a link to the action in the smart contract for claim rewards:
https://testnet.waxblock.io/account/dapplcminers?action=claim#contract-actions
This article has comprehensively outlined the principles and objects defined at the smart contract level, focusing on how to effectively implement a user interface for these elements in ReactJS.
By integrating UI components, developers can create a seamless and interactive experience that allows users to engage with the smart contract’s functionalities, such as staking items and claiming resources, directly within a ReactJS application.
PS. The Following link leads us to a repository that corresponds everything described, so you can simply build that code and use in a way you want.